It’s been a minute – Hi, hello!
Things change – as ever – and between putting down vintage selling for good in spring and shifting back into painting full time, last year I sewed exactly one project. Well, times four.
Remember that 1960’s Percy the Penguin slumber bag I re-engineered at the beginning of last year? I made four as Christmas gifts and it took up what little free time I had.
But! 2024 is lining up to be all about vintage clothes again! To say I’m excited is an understatement.
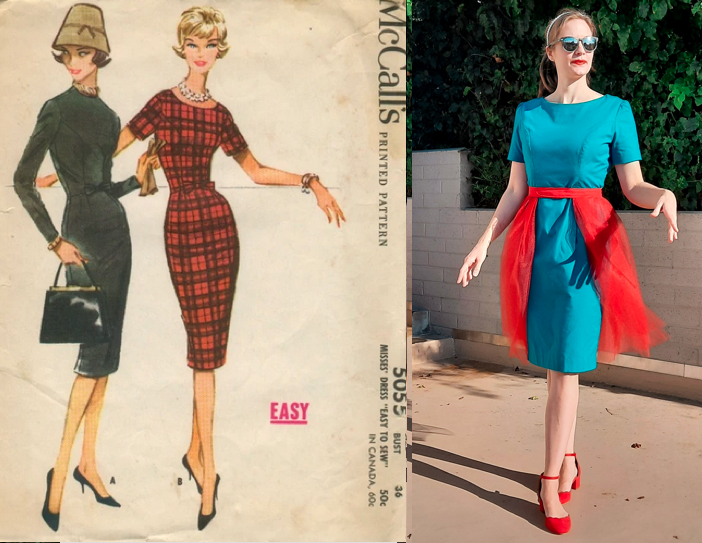
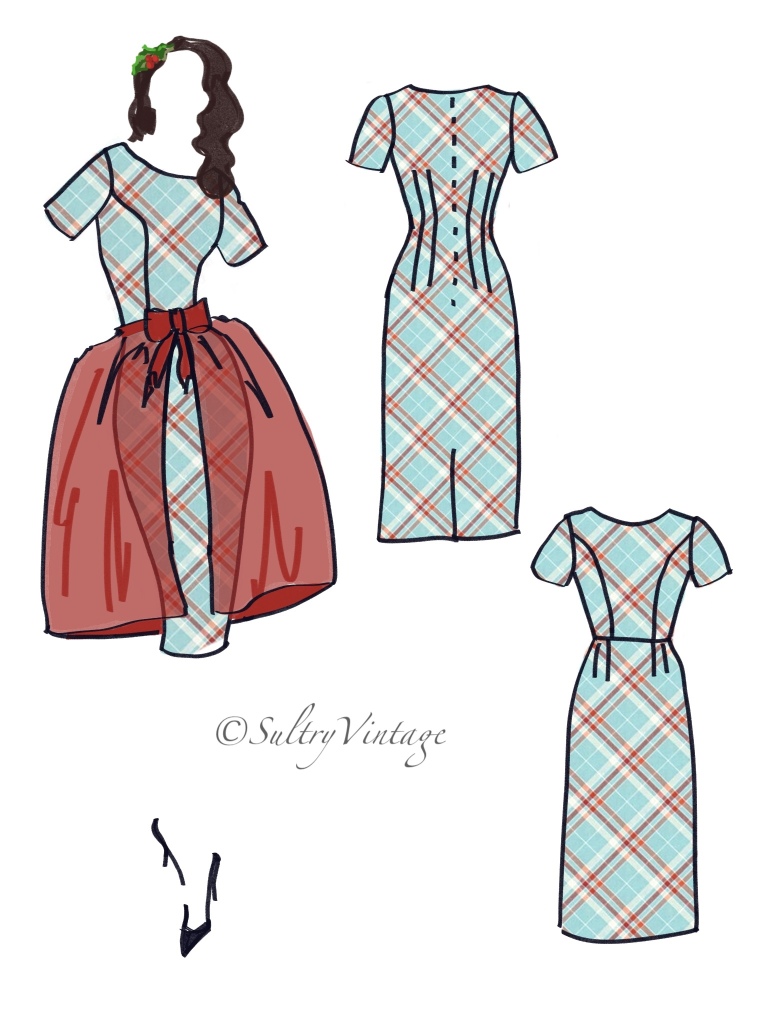
In fact, this post is catch up from December 2022. (Oi.) This is my holiday dress mock up – representing the best laid plans. As is my usual way, I reworked parts of this pattern to fit how I needed / wanted and it was – as all projects before it that I’ve decided to fine tune for my own purposes – full of research, lessons learned, and new skills tested. (I only banged my head on the wall a few times.) In the end though, success(ish)!
Time to make the final version! (With my first go at pattern matching, yikes.)
But before I get ahead of myself, here’s how this all started.
I saw this flannel fabric at Joanns (you know, the super snuggle that’s not a high quality flannel and probably terrible for any non-pajama clothes, especially fitted ones), but my plan is to stabilize by underlining and shrink the fabric down to tighten the weave and just, see how it goes.
I love the colors / pattern for a holiday vibe. Reminds me of snow covered berries. It’ll be a fun experiment any way you slice it. (Read: more lessons with a possible wearable outcome.) A trial run / second mock up with my first attempt at pattern matching, so it’s probably best this isn’t a high quality (read: expensive) flannel.
On this first go, I underlined the entire dress – the thought being I want this warmer for winter and to help with the structure. Next one I plan to separate out the underlining to an interlined shell for the skirt section (I’m a bit worried about the seat of the flannel stretching and hanging weirdly at the side seams if its underlined, best to detach the skirt pieces? Though maybe it needs that underlining for structure support? Guess I’ll find out.)
Here’s the dress without the overskirt. I sewed it from Kona cotton because I got it on sale and liked the colors. (I know, you should sew with the weight / drape of the fabric the final will be in, I went rouge.)

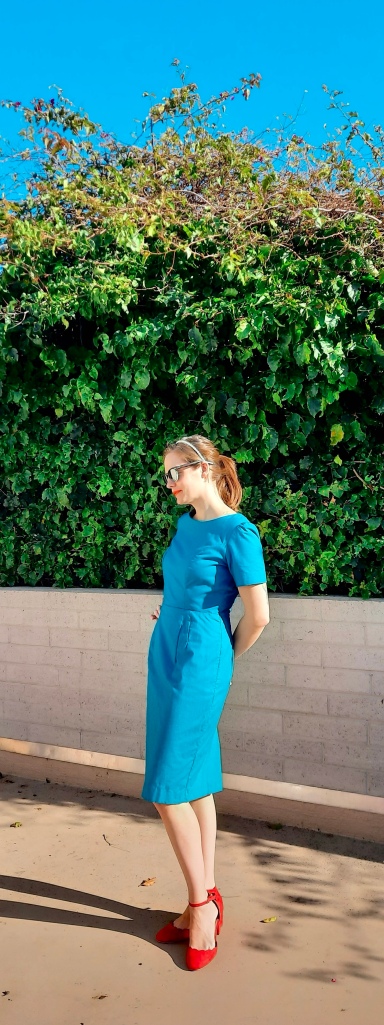

Pro tip – hard raking light is the best for a photoshoot /s. Though I do need to press those seams better after washing and probably pay more attention to my stitch length / tension. It’s a bit loose on me here as I can’t figure out if I’m a size 16 or 18 in vintage patterns, I seem to fall just between being tall with a wide frame but on the less curvy side. (The joys of sizing and pattern ease. Still getting the hang of it all.)
Note – I’m not wearing any era appropriate shaping or foundation wear here. If I’m being honest I take these pictures primarily for my sewing binder so I’m pretty expedient in my styling. (We’re lucky I’m even wearing a bra.) In future I do plan on wearing it out with proper shape wear. I’ll have to share photos then.
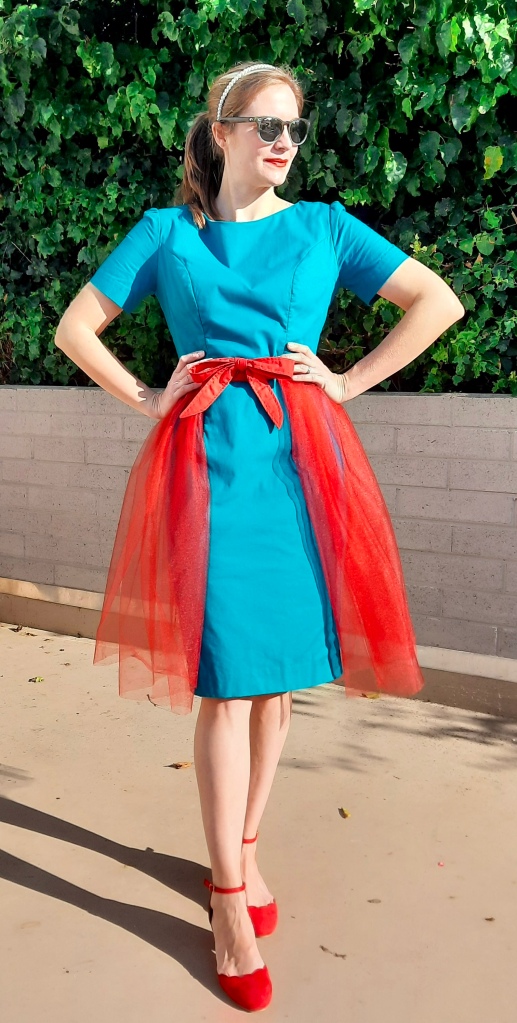
The pattern calls for a bow at the waist – stitched into the princess seams – but as I wanted an overskirt for this look, I made a removable bow to clip on the overskirt waistband instead. (All about versatile outfits!)
I did lot of small fit modifications throughout that made this a process – what I wouldn’t have given for a me-shaped mannequin while making the toile. (One day.)
The adjustments:
• Shortened the waist.
• Nipped the point out of the bust so it’s smoother as I won’t be wearing a cone shaped bra with this (a small adjustment that did so much for overall fit and silhouette) as well as taking in the princess seams.
• Taking in the sleeve seam a bit because of the bust adjustments.
• Lengthening the darts at the skirt front worked wonders for puckering that was buckling too much over my hips. (Which I’m guessing was happening because I shortened the waist so it moved that dart tip up from where it would have originally ended.)
• Took in the back darts.
• Tapered in the side seams from the mid-hip down so it nips in at the knees more. The pattern has a straight skirt that flares out a bit at the hem. I wanted to go for that shapely look (like this dress) so I measured where my hips start to curve and echoed that on the side seams. It worked out pretty well I’d say.


This was my first time doing princess seams – tricky! Here are the resources I used to get this smooth finish: 1 & 2. Also, for more videos about the making of this dress, check the stories on my insta.
While I’m at it, here’s a little trick I use for darts:
Some other additions:
• Added bra / slip strap holders (like you’ll find in vintage) to keep that sleek line of the neck uninterrupted.
• Sewed a pair of my dress shields that snap in and out for easy washing and no worries with sweat. (Read all about my underarm shields & the pattern I drafted for them here.)
Last detail (because I’m always about every little detail):
• Found a vintage metal zipper at the length and color needed (because I’m a bit of a metal zip snob? I have no idea why, I just prefer the metal over plastic).


Now for the overskirt – *laughs in sleepless nights.*
No but really, grinding on a deadline to get this done in time so I could wear it for Christmas, I stayed up just about all night figuring out the dynamics of this overskirt, from scratch, because I didn’t have a pattern. Never having worked with tulle before, I had no clue what I was in for. Probably was better that way (or I might not have even attempted this).
I learned a few things:
- Tulle is the devil’s handmaiden.
- Direction of pleats set into a band will determine how flatteringly the shape falls. I really wanted it to bell out from the waist (again, as those lying pattern cover illustrations show), so it took a bit of thinking and doing. My first attempt it laid horribly flat. (Though in these photos it’s not showing the work as the wind was blowing it down flat, whomp.)
- Tulle is the devil’s handmaiden.
Which is a bummer for me because I’m obsessed with sheer over-everythings (skirts, dresses, wraps, nightgowns. Give me all the flowy sheers). So it looks like more lightweight nightmares await me.


The band I drafted after making a belt for this set and working off the same principles. Just angled my pleats to fall the right way and stitched them into the band.
I lined up the ends of the overskirt to match with the front dress skirt darts, rolling the raw edge back in on itself to give volume and a nice visual finish. Really, I got lucky though – the width of the tulle allowed me to double layer it so the folded edge is tucked inside the band and I didn’t have to do any cutting. I bought the exact amount I ended up needing to give it a wide enough pleat and wrap around the length I wanted. Sometimes it just works out.


A few firsts for this make!
This was actually my first ever dress (?!), as well as full underlining, princess seams, and a kick pleat.
It was all fairly easy to sort out until the sleeves. I just could not make them work. I studied tutorials specific to this type of vintage dress for setting them in and the sleeve cap was simply too full no matter how I tried to work it out. If you can smoothly get these sleeves into this dress you are a powerful witch. So they’re slightly gathered, and after so many attempts – I’m totally fine with it.
This all may seem like a lot for one dress. The way I sew, I pick out staple silhouettes I know I’ll love for ages, put a lot of thought into adjusting for fit, and plan on making multiples with my fingers crossed I’ll be able to wear them for a long time to come. Bodies change, it’s the way it goes, but once I get past all the laborious adjustments of the first (or second) mock up, I leave myself such detailed notes I could sew the next ones sleepwalking, so they go fast. Well, apart from all the hand finishing, but that’s a fun meditation for me.
xx Lauren

Some fine print: All images (save the photo of the pattern) & text here are held under my copyright and are not to be used, sampled, or otherwise shared for any reasons – commercial, personal, or otherwise – without my express written consent. Thank you. The pattern shown here is an original pattern and part of my personal collection, I don’t offer copies at this time.
Lastly but most importantly – many, many thanks to my patient & generous person for listening to my sewing ramblings and taking wonderful photos. I’m lucky to have such magic in my life.

You must be logged in to post a comment.